Synchronizing Cameras | Wedding Photography
Maine wedding photographers, Russell and Liz Caron of Russell Caron Wedding Photography, demonstrate how to go about synchronizing cameras in Lightroom for easier work flow.
Synchronizing cameras is important when using numerous cameras that will be taking dozens, or perhaps hundreds, of images during an event. Anyone who uses multiple cameras at a wedding or during a project, will want the camera clocks to be in sync with each other. There are plenty of good reasons for synchronizing cameras, but they all center around the smooth flow of the images when they are all melded together. There’s little more frustrating than running through a wedding and having the bride and her dad walk up the aisle (from camera #1) with the next shot (from camera #2) of them at the alter, then bouncing back to the bride and her dad halfway up the aisle again because the clocks in cameras #1 and #2 are not in sync. And, “close enough” really isn’t close enough. You absolutely DO want these clocks to be within a second of each other. More than that is an eternity in the world of an event with rapid shutter clicks happening across multiple cameras.
The best way to avoid un-synchronized cameras is (get ready for this!) to sync them. Ha! Funny, right?! But remembering to do this just prior to the beginning of a shoot is huge. Say there are two shooters and each has two, or more, cameras. Decide on one being the “master camera”. Open that camera’s time and date setting screen menu. Use the displayed time on this master camera and set the second camera to match. Have the second shooter set both of their cameras to the master. “We just did this last week”, you say. “No need to do it again, right?” Wrong. For all their precision, the clocks inside our cameras are run off a separate small battery, and voltage variations over time (these batteries often last the life of the camera) in those batteries means no matter how accurate the clocks are capable of being, they can lose or gain several seconds in a short period of time, and across several cameras doing this the difference can grow into minutes. So, synchronizing cameras at the beginning of each shoot that is time sensitive, is best.

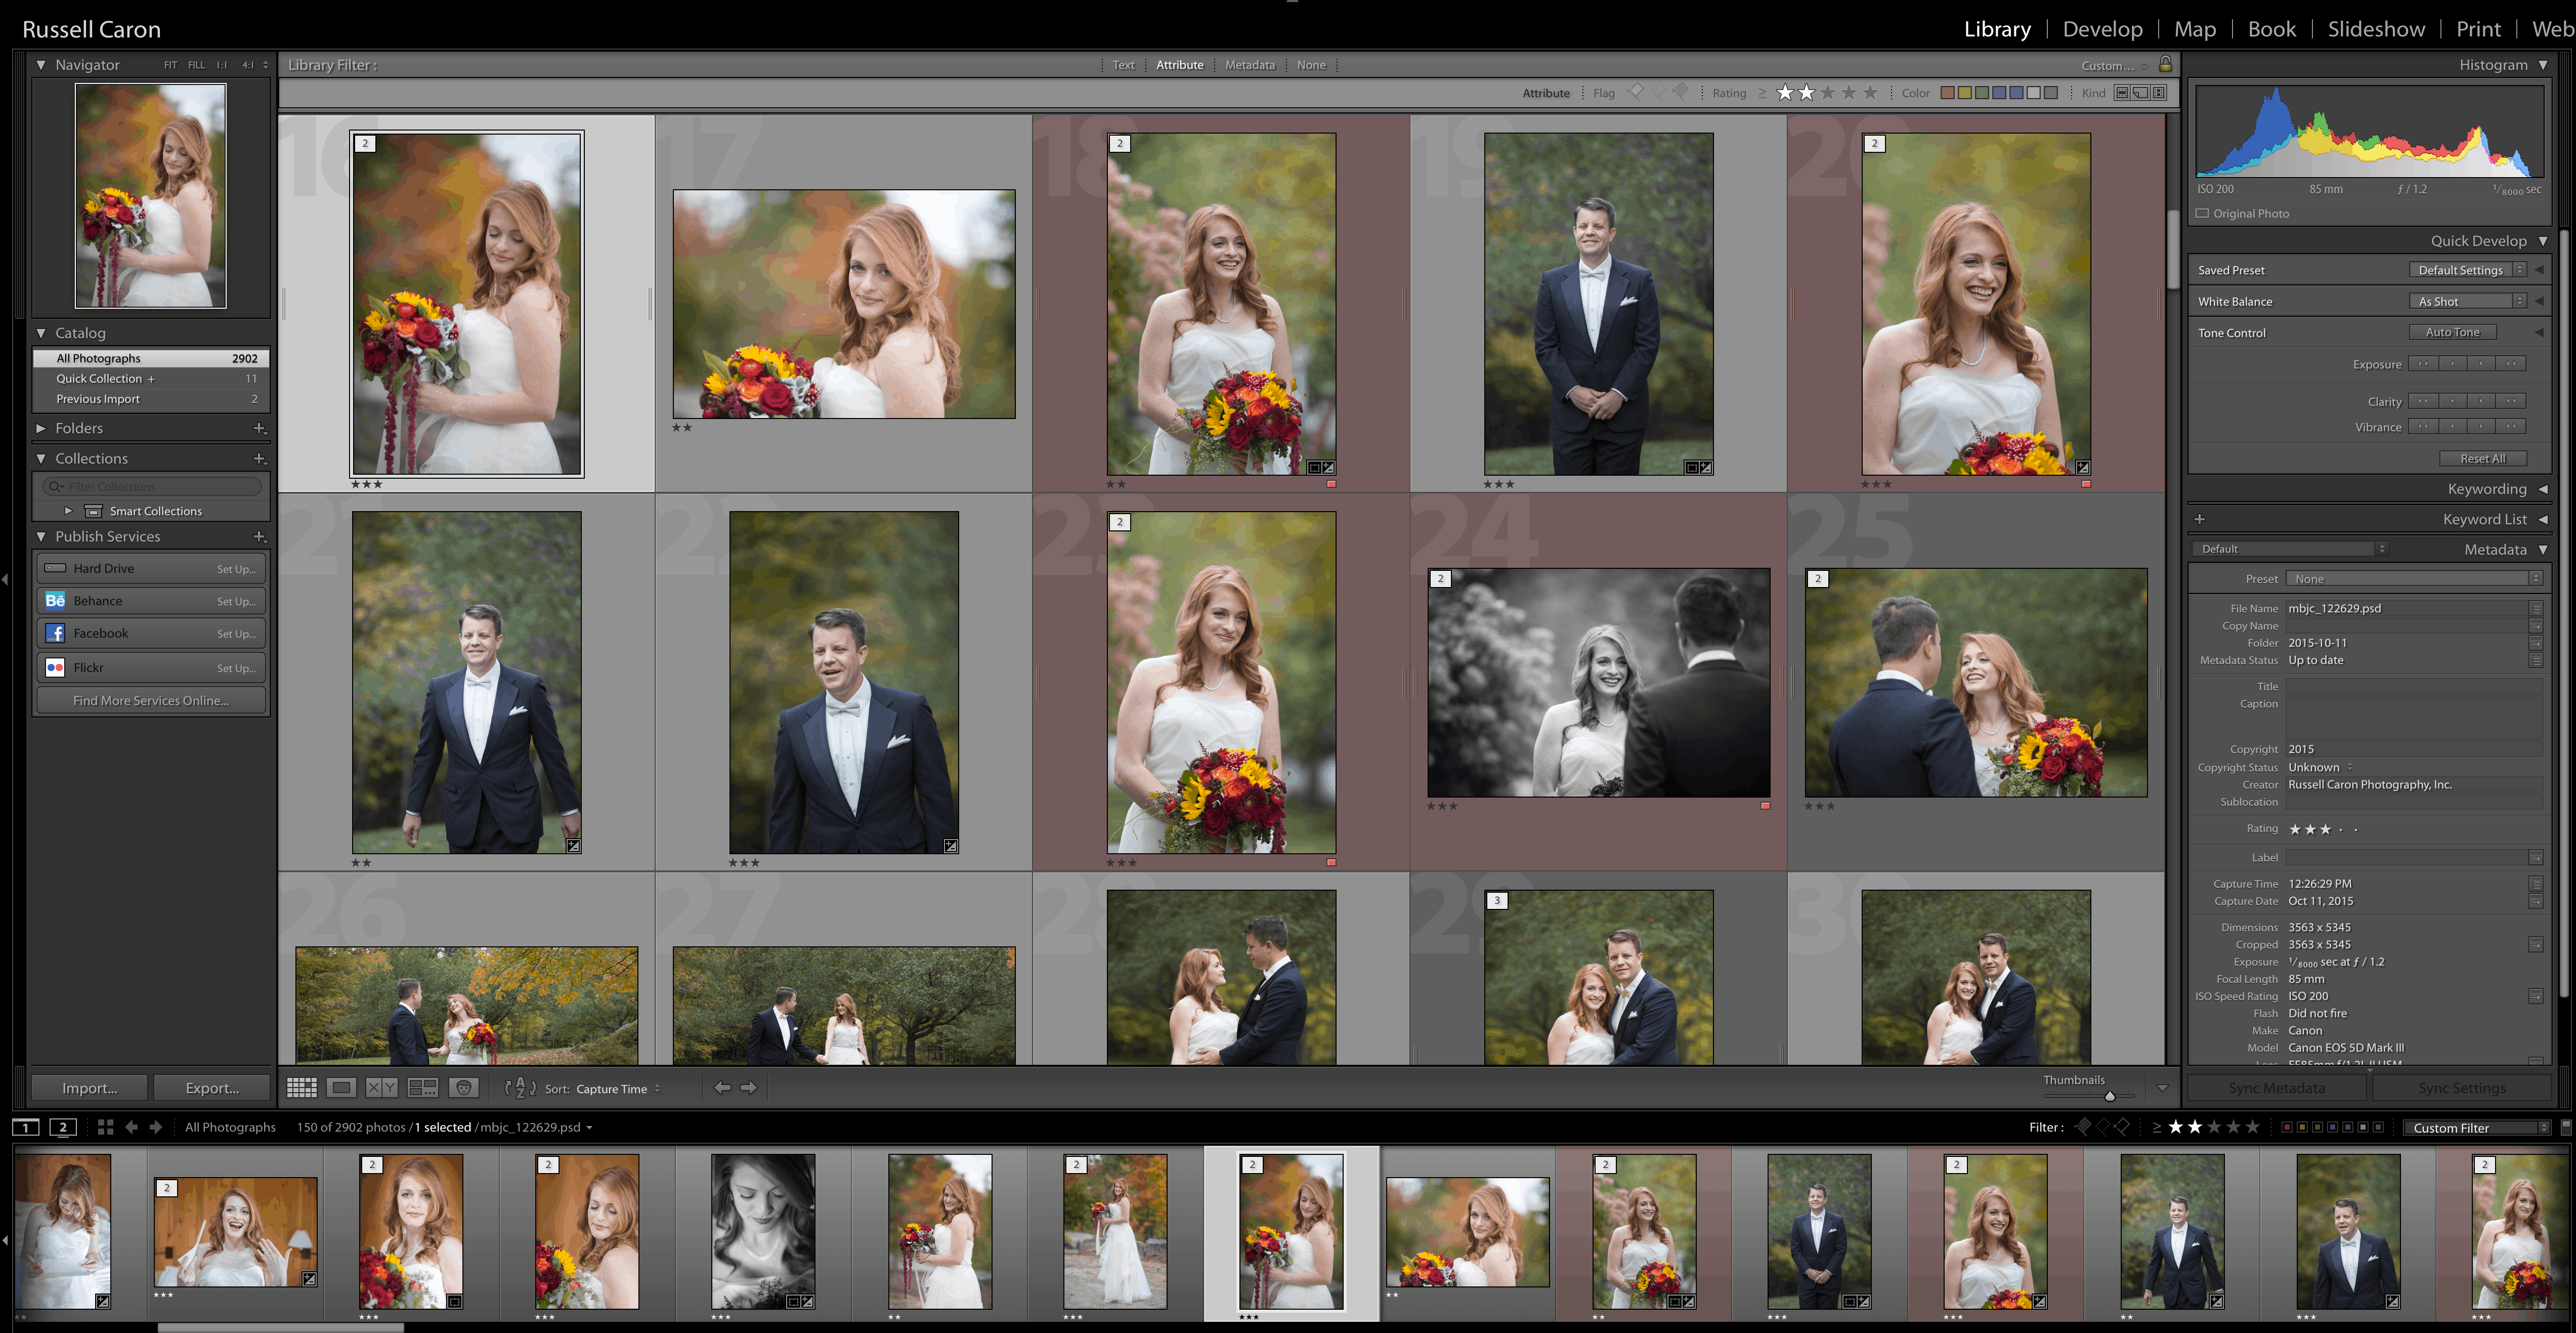
In the photos above, two separate photographers with synced cameras capture a first look in perfect sequence. The view from the Lightroom catalog shows that the sequence is smooth and in perfect order.
OK, all of this is great. But let’s say that, for whatever reason, that one or more cameras were some amount of minutes off. We can fix this, quite easily at that, using Lightroom.
Here is the way I go about making the adjustment. Let’s say, for the sake of simplicity, that one camera out of several was off by some unknown amount of seconds or minutes; all the images taken with that camera are not in proper sequence with the rest.
- Know which camera is ‘at fault’; i.e.the one that is off in its timing.
- Did you know it is easy to apply a “color tag” rating in Lightroom to specific cameras? To do this, while in the Library module, press the “\” [backslash] key.
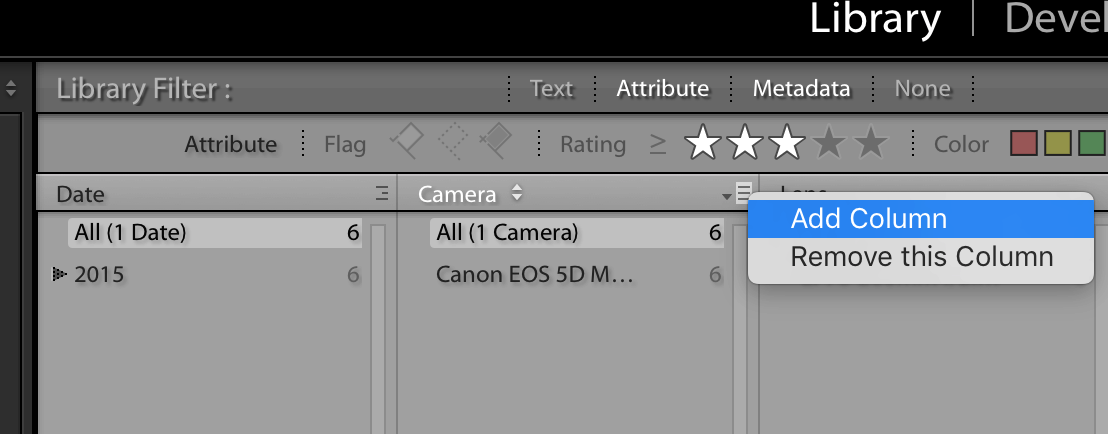
 If you have more than one camera of the same model listed in the Camera attribute column, you can add advanced criteria to filter by the camera’s serial number: To do this, press any column’s menu pull down (show highlighted in the ‘Camera’ column above) and select ‘Add Column’. Clicking on the menu item ‘None’ that will then appear in the top left side of the new column, a pull down/scrolling window will appear.
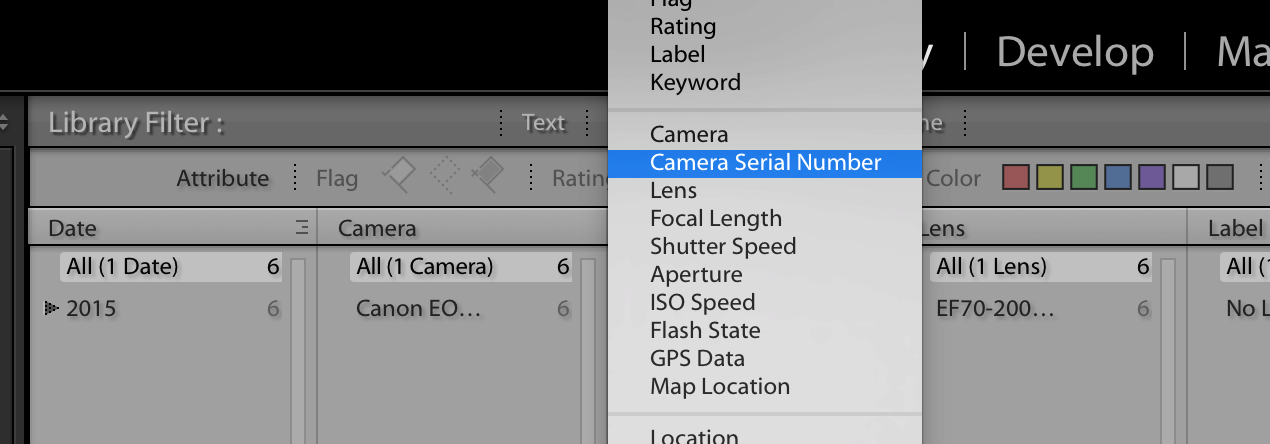
 From that pull down, choose ‘Camera Serial Number’. Using this, you can select each camera independently and apply whatever rating you wish (I suggest using a color code) to each camera. (In the screen shot above, the images with a ‘red’ frame identify the shots taken by Liz since we go through the identification process with each session; it just keeps everything really clear and easily understood to do so.) At this point, it is simple to isolate just the images taken by the camera with the incorrect time stamp.By the way, this is one of those many things that takes much longer to write out in step-by-step fashion than it does to actually do the task.
 - Now, lets figure out, as close as we can, how much time the incorrect camera is “off”. Again using the Library module, the time (and date) that the photo was taken is shown in the right hand window pane in the ‘Metadata’ section.

The key here is to find any one photo taken on the incorrectly time stamped camera that was also taken with the correctly set (‘baseline’ or ‘master’) cameras. Let’s say the event was a wedding. There is very likely a certain point that was for sure taken by all the cameras, like a first kiss or a certain portrait. One of the baseline cameras, for example, shows that this reference image is time stamped at 1:19:37 PM.Using the same process, find the photo taken closest as possible to the same moment with the incorrectly set camera. Start by ensuring that the ‘Capture Date’ is correct and thus matches the baseline camera, then look at the ‘Capture Time’. Let’s say you find that, yes, the date is correct but the incorrectly set camera says that the Capture Time was 1:17:17. - Now, we need to change ALL the offending camera’s time stamps, and the good news is that it can be done in one fell swoop, as follows:
Library module, filtered for only the incorrectly-set camera’s images
Select All using Cmd A on a Mac (or Ctrl A on PC)
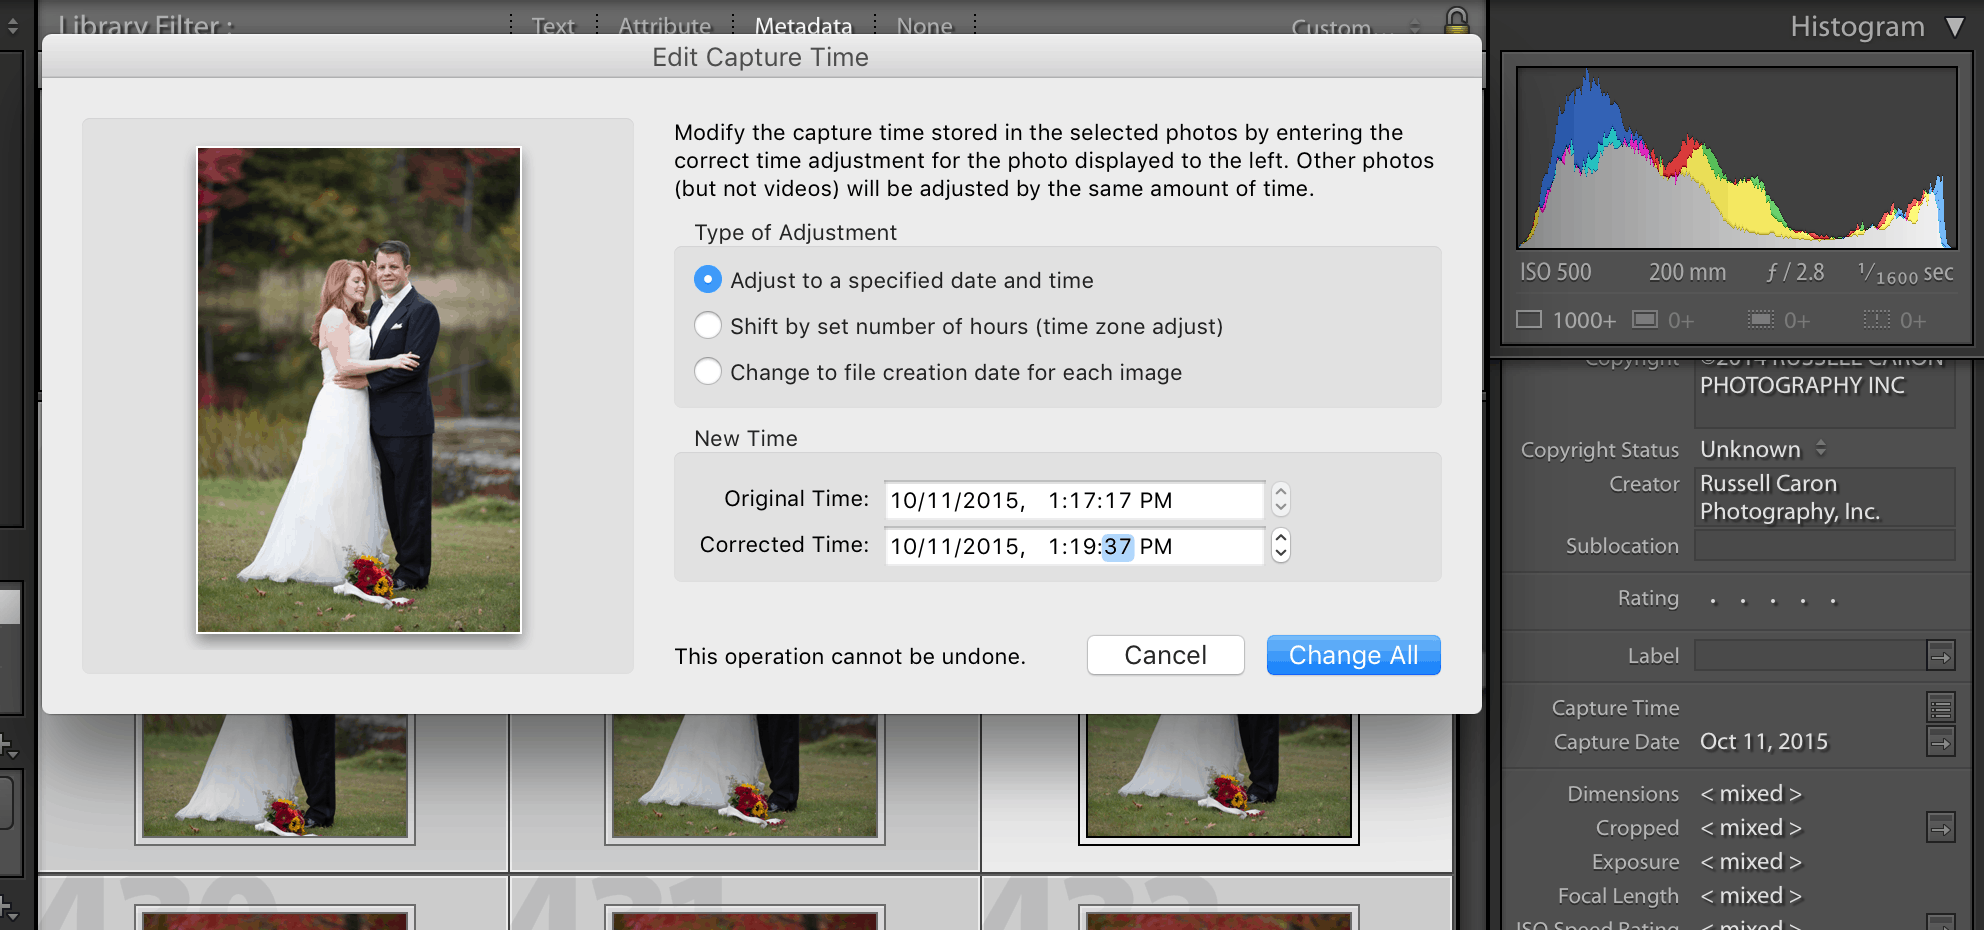
Click the menu button to the right of the Capture Time field in Metadata, which brings up the following screen: Choose “Adjust to a specified date and time”
Key in the corrected value (1:19:37 PM) for this one image
Press Change All.Voila! Just that that, it’s all DONE!
Lightroom calculated the differential (2 minutes and 20 seconds) and applies that change to ALL the images (recalling you have already selected them all) taken by that camera. Now, in the library view, all the incorrectly-set camera’s images are precisely in their correct places!CLOSING THOUGHTS
Even if you couldn’t determine the exact amount of error of the incorrectly-set camera, often enough an “educated guess” will yield enough correction to properly sequence the images. And, if you “came close” but not exact, you can always repeat the process, fine-tuning the adjustment time until you have it just right. Finally, if more than one camera from a shoot was off, just repeat this process independently for each camera.

 If you have more than one camera of the same model listed in the Camera attribute column, you can add advanced criteria to filter by the camera’s serial number: To do this, press any column’s menu pull down (show highlighted in the ‘Camera’ column above) and select ‘Add Column’. Clicking on the menu item ‘None’ that will then appear in the top left side of the new column, a pull down/scrolling window will appear.
 From that pull down, choose ‘Camera Serial Number’. Using this, you can select each camera independently and apply whatever rating you wish (I suggest using a color code) to each camera. (In the screen shot above, the images with a ‘red’ frame identify the shots taken by Liz since we go through the identification process with each session; it just keeps everything really clear and easily understood to do so.) At this point, it is simple to isolate just the images taken by the camera with the incorrect time stamp.By the way, this is one of those many things that takes much longer to write out in step-by-step fashion than it does to actually do the task.
 Choose
Very helpful, thanks!